2020/08 Cola Daily Build

08/03

有語法糖也有語法鹽(嚴)

把 github pull request 拉下來(本機)

e.g. branch name: cscolabear:feat/is-my-branch-name

git fetch origin pull/ID/head:BRANCHNAME
e.g. 
git fetch origin pull/ID/head:BRANCHNAME
git fetch upstream pull/123/head:feat/is-my-branch-name

git checkout BRANCHNAME
e.g.
git checkout feat/is-my-branch-name

若 PR 有更,也想要更新時~
可以先切換到別的 branch 重新 fetch

08/04

osx /mac os native vpn (l2tp)

  1. 點擊 wifi 圖式, 選擇 Open Network Prefernces

  2. 點擊 + 號新增連線方式,選擇 vpn, type 使用 L2TP
    name 依自己需求

  3. 上述動作完成後,再點擊 Advanced

將 Send All traffic over VPN connection 打勾

這麼一來就能讓所有網路行為都透過 VPN IP 連線了!

08/07 line notify 行為流程

line notify API

實際流程大概為

開立 line 群組,加入通知對像(實際使用者),加入通知對像 line notify bot

產生群組或頻道 token

08/09 mysql explain filtered?

filtered 與 rows 相對應

使用 regexp…

表示候選結果對像有 779 列,篩選 100% 後找到想要的結果

使用 like…
可能因為 index 或變更 where 條件,只需要篩選 29 列 (*3.76%) 就能找到結果

filtered 他不是調交的第一優先比較值(大多數的說明,都提到 filtered 是一個非常粗估的值)

能更直接減少候選列更好 (rows)

ref.

08/09 drone ci without public domain first build job

drone ci 如果沒有 public domain, 是沒辦法進入 repo build 畫面

(ps: 沒有 public domain, 但 git repo 還是能正常拉到最新資料)

因此也沒辦法,在沒有 domain 的情況下直接使用 restart 鈕重新 build job
目前,也沒找到任何方法觸發 create job, build job 等; drone cli 也需要指定 job id
(drone version 1.2.2)

因此用 tricks 的方式建立第一個 job
之後都可以用 drone UI, drone cli 手動觸發

在 dron repo sync 完成後
打開 drone 的 database.sqlite
插入以下 sql,替換其中 build_repo_id 為正確對應的 id

INSERT INTO "builds" ("build_id", "build_repo_id", "build_trigger", "build_number", "build_parent", "build_status", "build_error", "build_event", "build_action", "build_link", "build_timestamp", "build_title", "build_message", "build_before", "build_after", "build_ref", "build_source_repo", "build_source", "build_target", "build_author", "build_author_name", "build_author_email", "build_author_avatar", "build_sender", "build_deploy", "build_params", "build_started", "build_finished", "build_created", "build_updated", "build_version", "build_cron", "build_deploy_id") VALUES
('58', '35', '@hook', '58', '0', 'success', '', 'push', '', 'https://github.com/cscolabear/resume/compare/2e584fc0b236...64a785fbacea', '0', '', 'Chore: remove mobile', '2e584fc0b236a6c91254d1732a78a847ebd7b176', '64a785fbacea34d3d5bef6c130900717f8007472', 'refs/heads/master', '', 'master', 'master', 'cscolabear', 'Cola', '[email protected]', 'https://avatars0.githubusercontent.com/u/4863629?v=4', 'cscolabear', '', 'null', '1596956750', '1596956798', '1596956741', '1596956750', '3', '', '0');

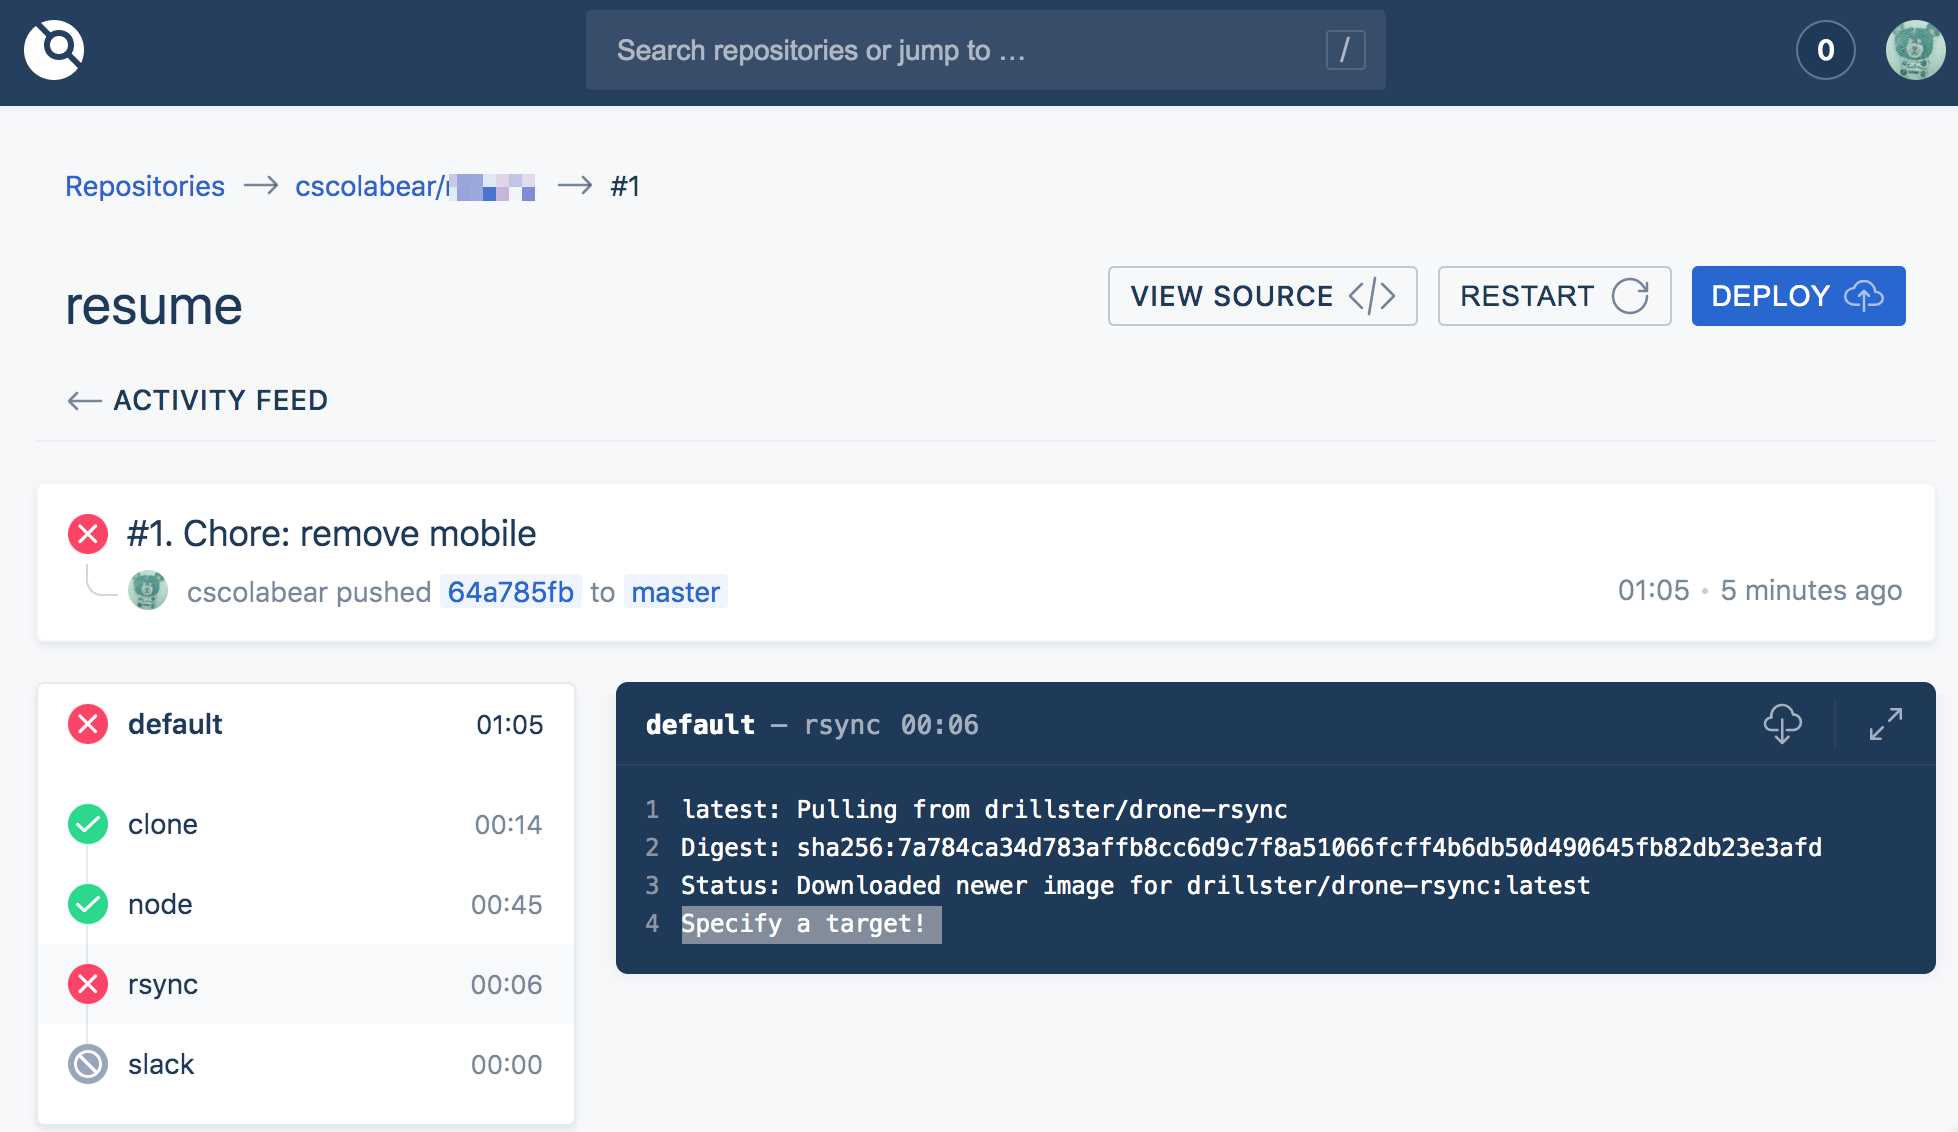
插入後,就可以在 drone UI 中看對應的 build job
你也可以做後續動作了…

… drone 作者好像有些堅持不加入直接手動觸發

08/11, 08/12 nodejs pdfmake

一份 PDF 的產出
先用一張圖片打底
再設定動態文字內容,調整 margin, absolute position


分頁實作 Offset/limit-based Pagination, Cursored-based Pagination

08/18 08/19

中文異體字,常見特殊字的處理方式

不需另外造字

𫙮
𩻫

image

國家發展委員會
https://www.cns11643.gov.tw/search.jsp?ID=2&modeP=3&SN=弓火弓手木

字型這裡下載
https://www.cns11643.gov.tw/AIDB/Open_Data.zip

ubuntu install font, 安裝字型

8/20 ~ 8/28 taiwan e invoice / 電子發票 barcode 39

使用圖型式套件生成的 barcode
電子檔能正常掃描
但是列出來後就會無法掃描,barcode 會糊掉

轉 svg 亦同
如果加大圖形則會讓 barcode 超出發票寬度、或是變形也造今無法掃描

解法:
使用 barcode font / 字型生成 barcode
font truetype, 可以不失真放大縮小,被處理過,適合的字型
也可以在一定高度內 fit 發票寬度

發票寬度為 5.7cm, barcode 39 寬度約 5cm 以內
barcode 39 的高度需為寬度的 15%; 5*15% = 0.75

barcode 如果沒有一定高度和週邊留白(quiet zone) 掃描器會難以掃描

電子驗證:
http://www.datasymbol.com/barcode-reader-sdk/barcode-reader-sdk-for-windows/online-barcode-decoder.html

ref.

題外話:讀取器